Migrate Wordpress blog to Next.js on Github pages - part 1
Wordpress is a way to go solution for many projects. I was using it for a many years in a different projects. But when you're developer there's too much pain expecially for personal blog
- heaviness
- pluging can make site very heavy to load
- 3rd party plugins with unknown components inside
- hosting & security
- possible security issues and eternal port scaning. If you check server access logs you'll find port scanning almost every minute, ssh scanning
- hosting payments. Not so big deal but anyway as I'll use GitHub pages for hosting this point is a small benifit.
- plugins vs coplicated customizations
- when you need to add some simple functionality you have to use 3rd party plugin or make all the changes from scratch in PHP with all possible pitfalls on the way
This was my motivation to move to static site generators and GitHub pages. A quick look to the landscape of SSG brought me a few candidate - Next.js and Gatsby because the use Javascript and React. The choice was made by coin and Next.js won.
What are your benefits of using SSG?
- HTML - old good html, it's blazing fast. It will be highly reated by Google.
- Markdown's driven post writing experience. That's fantastic when you can use your favorite text editor with all tricks you've learned over the years.
- Absolute control over content and styling (which can be an issue on Wordpress after major releases of some plugins)
Part 1 contains the following parts:
- Initial project's setup
- Deploy to GitHub via GirHub Actions
- Some pain with data migration
- Custom domain
1.1 setup GitHub repo to host your project. 2 options here - setup your personal/org repo on your-username.github.io or to enable GitHub pages inside other repo. I already had personal repo so I decided to create new one in separate repo.

Then you need to go to the repository's settings and select branch which contains publishing sources in GitHub Pages section. In my case a master branch containts a nextjs code, markdown, resources, etc and gh-pages branch contains static html generated from sources in master branch. So select gh-pages and root folder. Here's official instruction. As a result I got a site running under https://pavel-slepenkov.github.io/blog-nextjs.
1.2 Clone github repo to local machine
git clone git@github.com:your-username/your-username.github.io.git
or
git clone git@github.com:your-username/repo-name.git
in case if you configure GitHub pages in other repo
1.3 To start working with Next.js I recommend to spend some time with official guide (Yes, you're right I just copied base tempate of the tutorial and use it for this blog 🤷♂️). Here's almost nothing to write about.
in short
cd your-project-repo-local-folder
npx create-next-app src
npm run dev
now you can check http://localhost:3000 and see

In this point I recommend to go though official guide and make some initial version of your site. Do not forget to add your changes to a version control from time to time.
2.1 create the following folder structure in your project's root directory in the same level with src folder
.github/
└── workflows
    └── main.yml
main.yml
name: Build and Deploy
on:
  push:
    branches:
      - master
jobs:
  build-and-deploy:
    runs-on: ubuntu-latest
    defaults:
      run:
        working-directory: ./src

    steps:
      - name: Checkout 🛎️
        uses: actions/checkout@v2.3.1
        with:
          persist-credentials: false

      - name: Cache  💾
        uses: actions/cache@v2
        with:
          path: ${{ github.workspace }}/.next/cache
          key: ${{ runner.os }}-nextjs-${{ hashFiles('**/package-lock.json') }}

      - name: Install and Build 🔧
        run: |
          npm install
          npm run build

      - name: Deploy 🚀
        uses: JamesIves/github-pages-deploy-action@3.7.1
        with:
          GITHUB_TOKEN: ${{ secrets.GITHUB_TOKEN }}
          BRANCH: gh-pages # The branch the action should deploy to.
          FOLDER: src/out # The folder the action should deploy.
          CLEAN: true # Automatically remove deleted files from the deploy branch
The build contains 4 steps:
Checkout sources from master branch (do not forget to change it to name of branch which you use as default)Cache action allows caching dependencies and build outputs to improve workflow execution time.Install and Build just run npm commands.Deploy automatically deploys your project to GitHub Pages. I highly recommend to check out this project's home page and read the docs. It has many options which can be useful.
2.2 tune package.json
when you created a project with npx package.json looks like that
{
  "name": "src",
  "version": "0.1.0",
  "private": true,
  "scripts": {
    "dev": "next dev",
    "build": "next build",
    "start": "next start"
  },
  "dependencies": {
    "next": "10.0.5",
    "react": "17.0.1",
    "react-dom": "17.0.1"
  }
}
but GitHub deployment requires some tuning in build step
"build": "next build && next export && touch out/.nojekyll",
lets check each step here
next buildbuilds the production applicationnext exportallows you to export your app to static HTML, which can be run standalone without the need of a Node.js server. That's just what we want.touch out/.nojekyllcreates file which required for bypassing Jekyll processing on GitHub Pages. This's necessary if your site uses files or directories that start with underscores since Jekyll considers these to be special resources and does not copy them to the final site.
You can also create .nojekyll file directly in gh-pages branch and github-pages-deploy-action should not to remove/rewrite it.
After all you can commit these changes and push it to GitHub. If you did all the steps in correct way you will find GitHub Action running in your repo

And withing 2 minutes you'll get your site up and running.
Yeah, you need to migrate a content and might be styles and functionality of your initial site.
For data migration I used WP-Gatsby Markdown Exporter plugin. It allows me to download all data from my Wordpress site as archive with markdown files for posts and pages, images. To be honest that's no a very convenient way because this markdown might be corrupted in many places. Mostly for code formatted with some funcy wordpress plugin. But anyway that's a good start. I moved all markdown files into posts catalog and just pushed it to GitHub. In just a five minutes I had all posts hosted on new blog. Yes, it required a fixes and I spent some time on it as well as moving images to correct location and linking it with posts. As I have not so many posts on my blog this was not a big deal. If you have hundreds or thouthands of posts it might be real headache and I'd recommend to research for more advanced option for moving content. It might be a more advanced wp - markdown migration plugin, or it might be that you will create some script which automate this routine job. Anyway your content is differ and you need to find your own approach to this.
Style and functionality migrations are out of scope of this post. But if you start with SSG I believe you can code and it's not a big deal to move styling. I'll cover some such things in part 2.
It's pretty easy part because there's a good official documentation
-
Configure repo to use custom domain
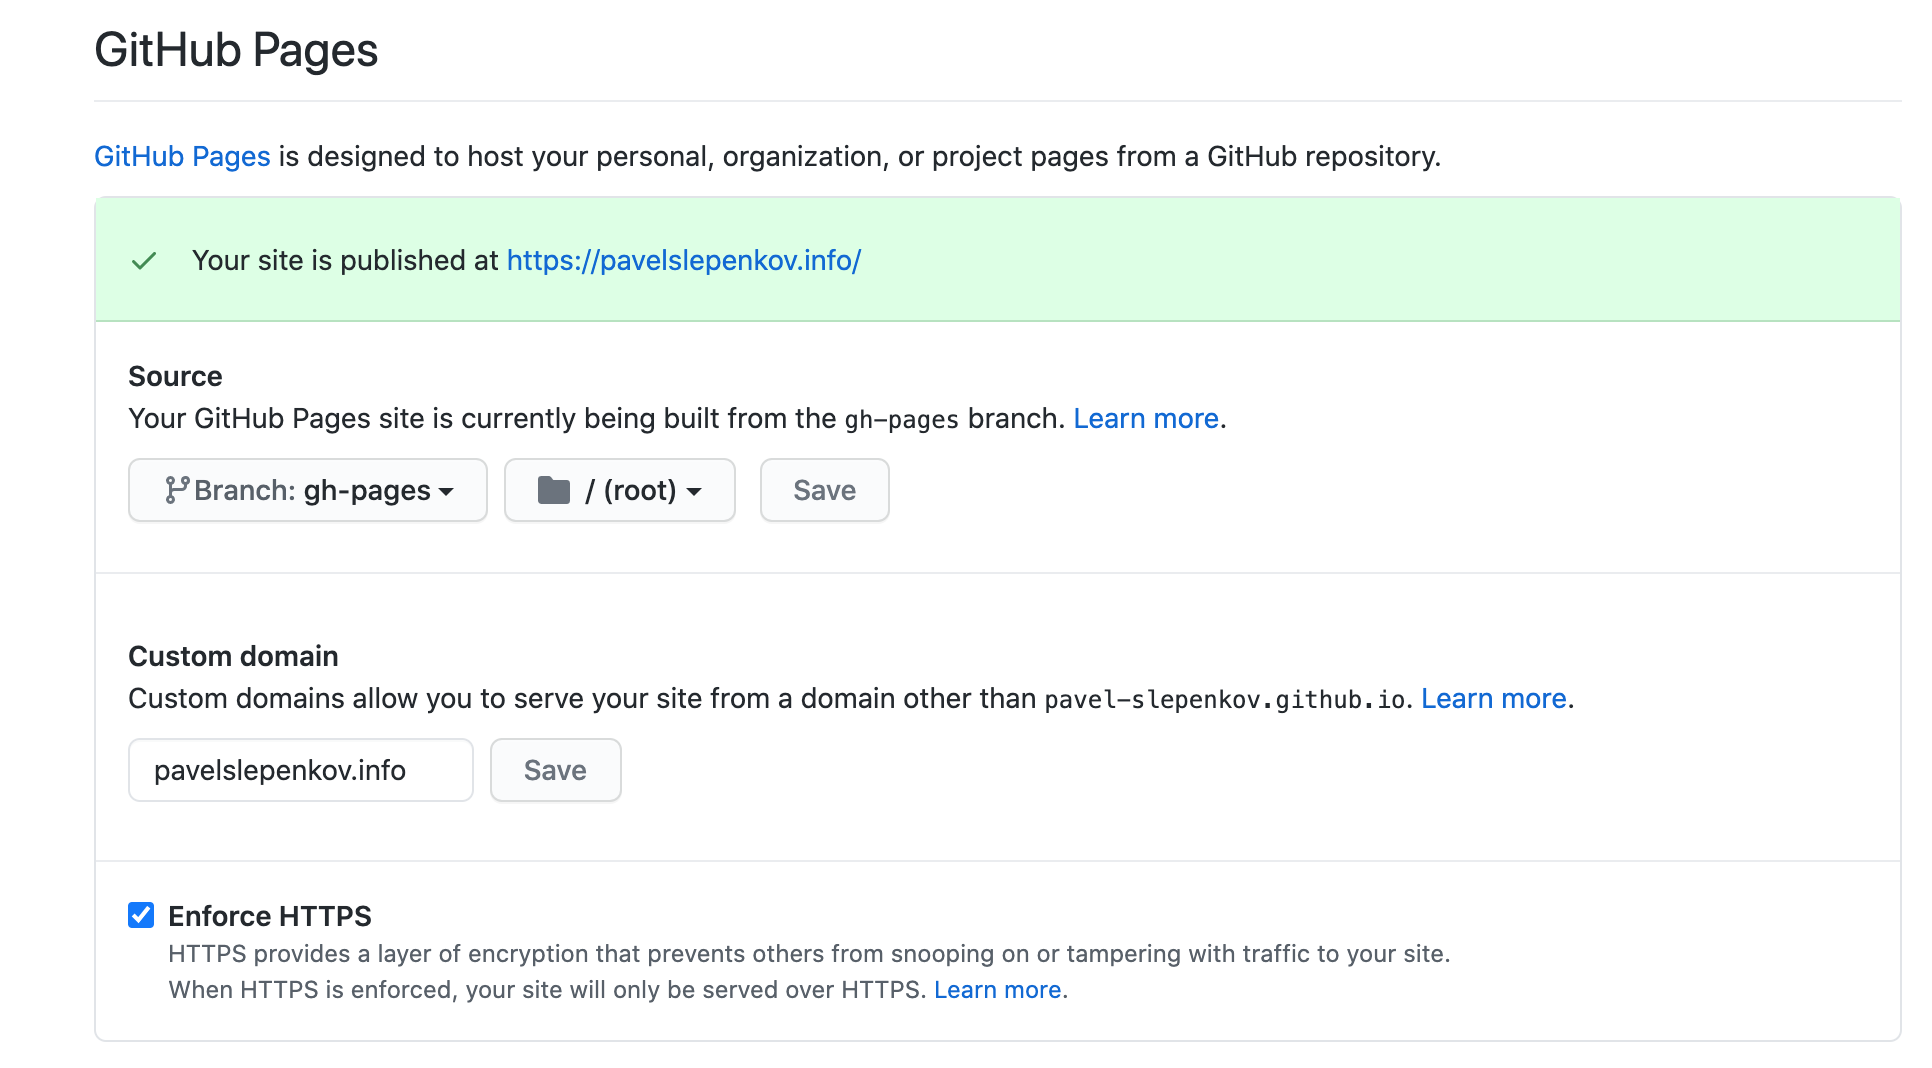 Note Enforce HTTPS checkbox
 -
Configure DNS
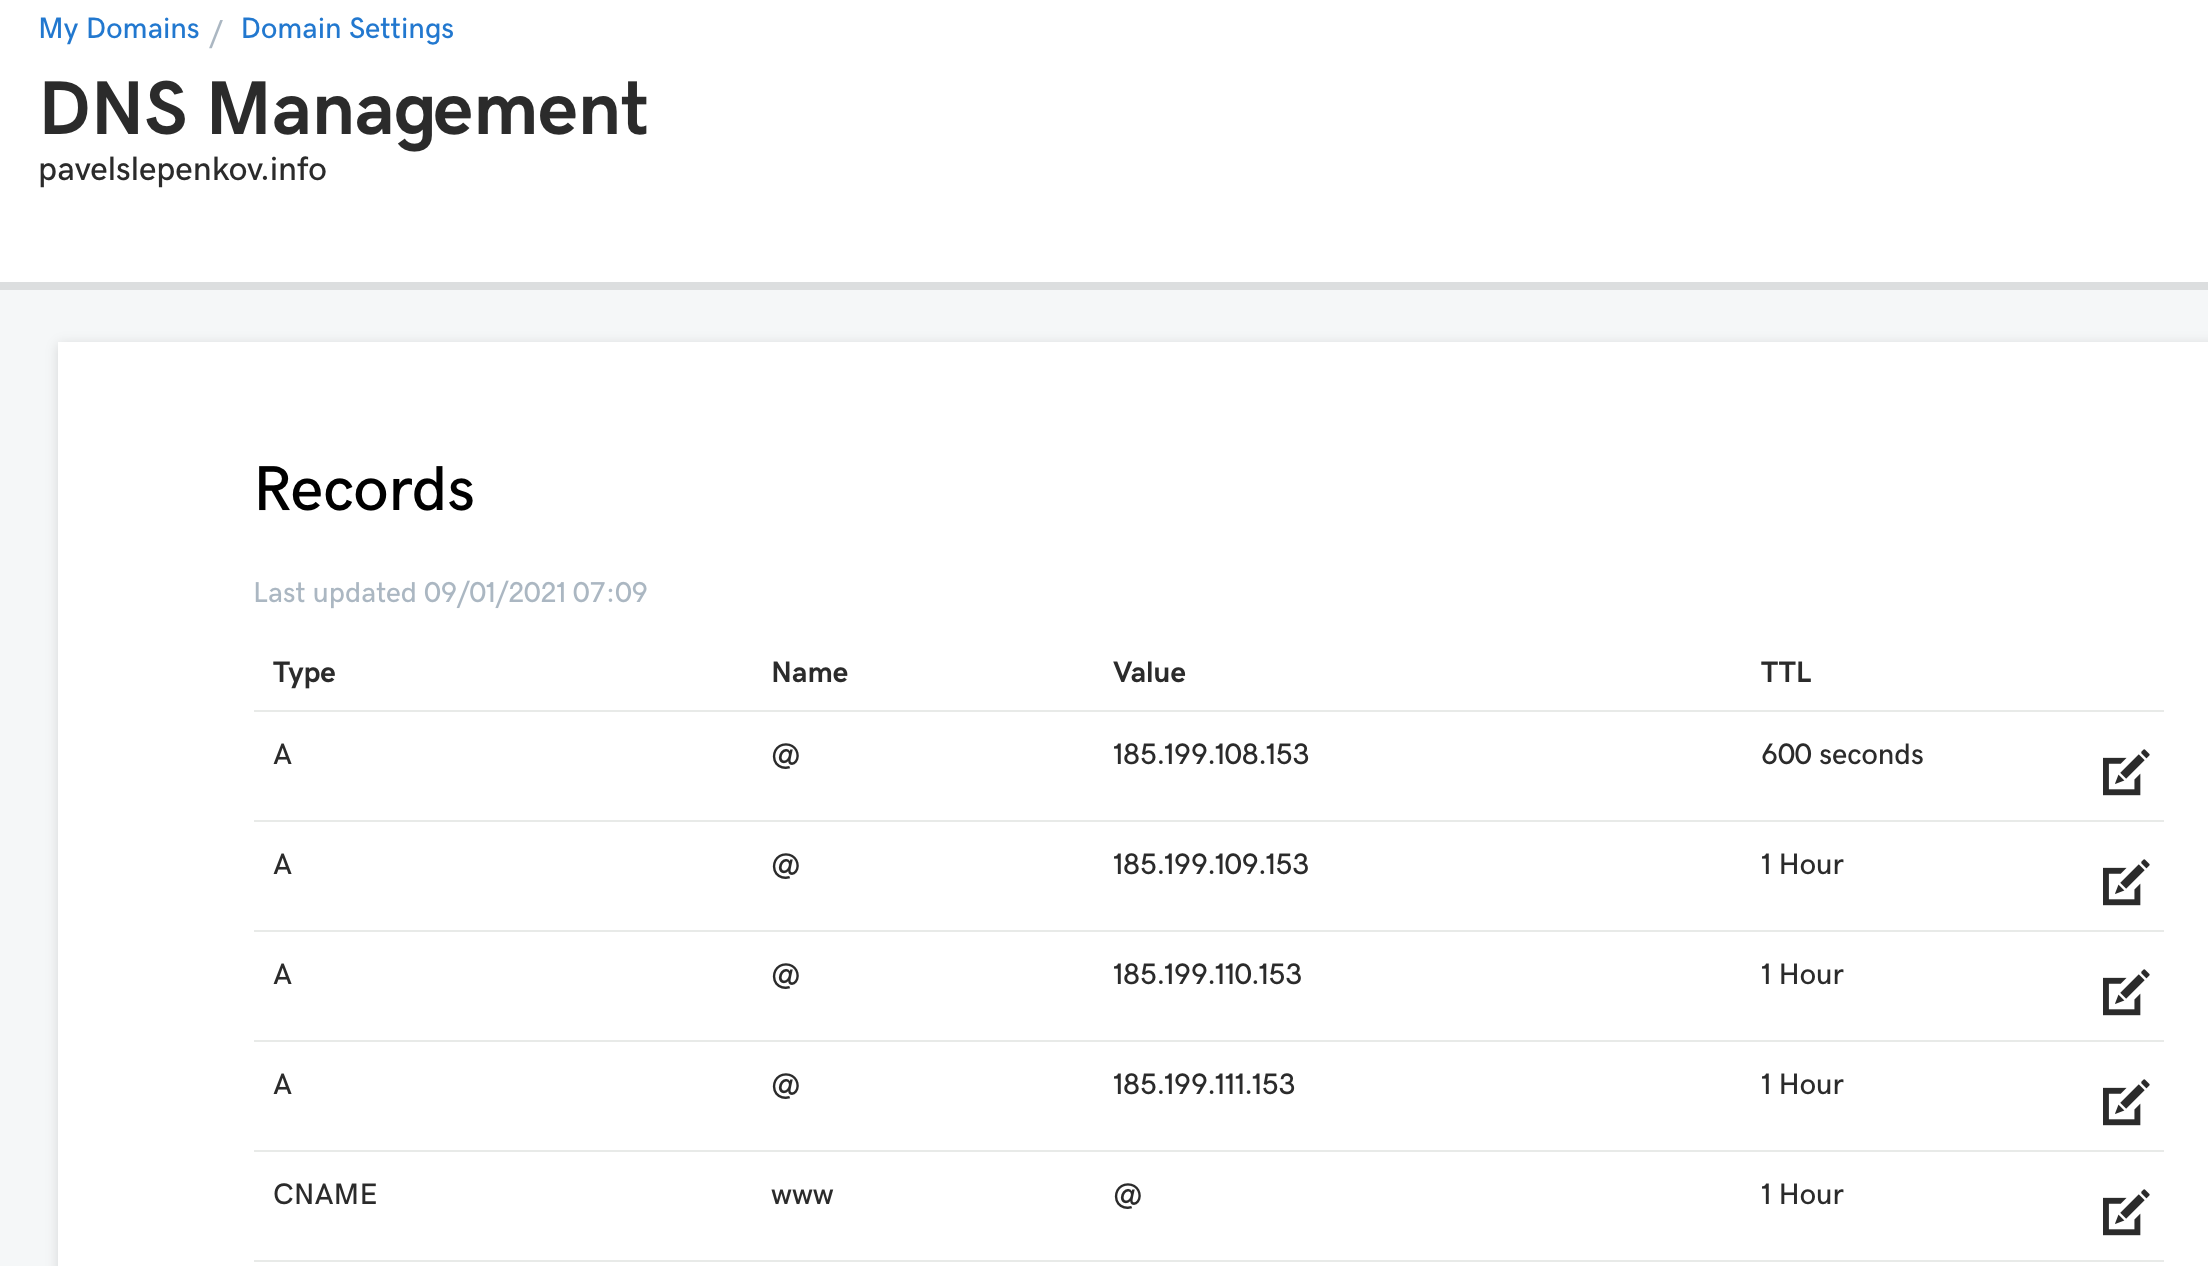
-
Add CNAME file which contains domain name to your repository. In my case this file must be in gh-pages branch. You can directly commit this file or add one more command to build step
&& echo 'pavelslepenkov.info' >> out/CNAME
Wait some time for DNS update. Check your site on http:// and https:// version. Than check https://www.yourdomain.com and cry because most probably it will show some sort privacy error. To overcome this I did a trick (I hope it will help you too, but github can change anything in it's enginee in future)
- add www. in custom domain setup and save. Enforce HTTPS can be unckeckable in this point.
- wait until your site start to respond to www. subdomain
- roll back changes in github setup and set domain to version withou www, check Enforce HTTPS.
Finally my project structure looks like that
master branch which contains all the code

gh-pages branch which contains statically generated version which hosted on Github pages

That's all for today